Choices, Choices - Do It Yourself Or Sub It Out?

To Do Or Not To Do? 

That is the question. Whether 'tis nobler in the mind of the craftsman to do all the work himself, or to suffer the slings and arrows of critics for subcontracting some of the labor burden to others.

This situation may be more specific to me as a business, but the principle can be applied to everyone. As I was bidding on my current project, a rustic office, I was faced with the decision of what to do about milling the beams? Is this something that I should do or pay someone else to do it for me? 

As a remodeling contractor I am faced with this decision on every project. How much of the work should I do myself and how much should I hire out? Plumbing and electrical issues are easy to decide, Montana State regulations and my liability insurance won't allow me to handle these. But most all other facets of the trade are open to being done at my discretion.

I determined that I needed to cut each of the beams into quarters for the full length. I have the equipment necessary to do the job and I could hire someone for the day to help me handle the material.

To make a good decision, I realized that I needed to become better acquainted with the material. To do this, I took some small beam sections and did a practice run milling them on my equipment.

Milling Beams On Bandsaw

I had never milled anything this rough and unwieldy on my bandsaw. I snapped a chalkline down the center line of the beam and cut it in half with great results. Next I shaved the sides open with an equally impressive result.

Pealing open the sides of the beam.

After cutting them open on the bandsaw I finished processing them on the planer and then squaring them up on the jointer.

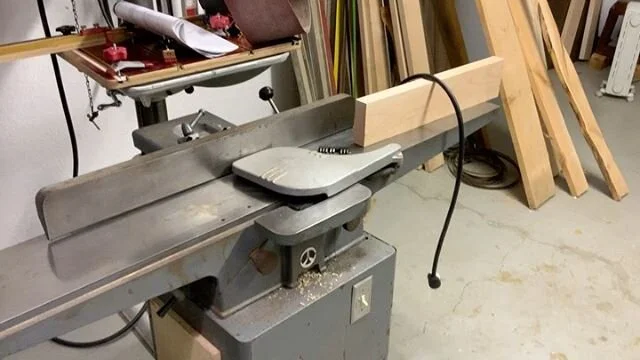
Sending beams through the 15" planer.Squaring up on the jointer.

When I was completely finished I had milled open three beams at 44", 30", and 22" long and they looked great. It was exactly the stock that I was hoping for.

Resawn, planed, and squared.

Collecting The Data & Making A Decision

As I milled the beams there were various types of information that I was looking for. I tracked my time, observed the handling characteristics of the material, the capabilities of my equipment, and included the clean up as well.

I determined that I could well handle the smaller beam sections, but an 8' or 9' beam might be a bit difficult. I could control a short piece for straight cuts down the middle and shaving open the sides, but probably not so effectively on a long one.

Sending the pieces through the planer and jointer was a bit of skewed data. I determined that I would actually be cutting the beams into quarters, not just in half as I did with these sections. The quarters would be more easily handled than the half beam sections.

My equipment seemed capable of handling the weight of the material, but it sure was tough on the knives and blades. The pitch and the dirt trapped in the beams was really hard on all of the cutting edges. It took forever to clean up the mess on the equipment and in the shop. 

By tracking my time I was able to figure out how many man hours I would have wrapped up in the rough mill process. This time has to include everything from getting it in the shop, set up, milling, through the clean up.

There was a certain point that I realized my shop and equipment would best handle the material. I had determined that point was after the rough millwork was done by another shop.

The local shop that I used had an old Delta bandsaw that must have stood 8' tall. It had  a 3-phase power feeder that looked like it could pull a semi truck. All that I had to do was drop off the beams and pick up the rough milled stock. 

Saving my equipment from the abuse combined with the convenience factor made the decision a no-brainer. I subbed out the rough milling.

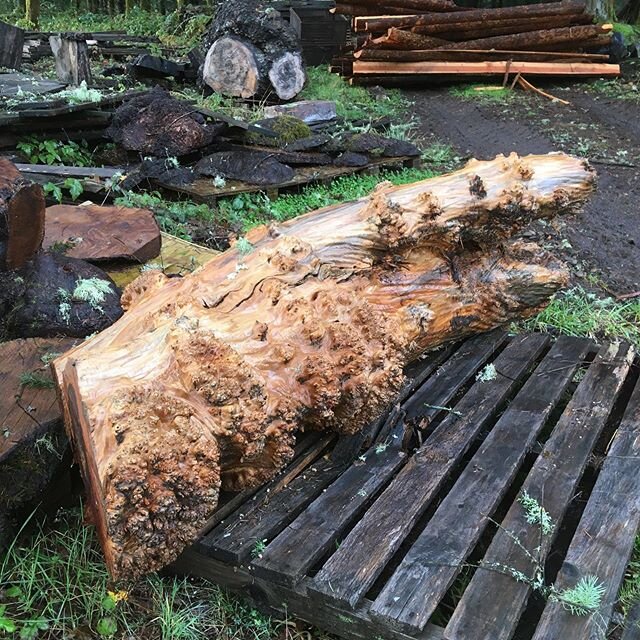
Rough milled beams from local mill shop.

The Lesson Here

Just because you can doesn't mean you should.

Everybody will have a different set of parameters by which they make personal decisions on what they can or can't do in the shop. I hope that with sharing my experience you may be able to make better decisions in your own shop.

That is all for now. Be sure to stop back often.

Your friend in the shop - Todd A. Clippinger

Share the Love ~ Share the Knowledge

A Shop Tip & A Door Model

Shop Tip

During the construction of a project there is often a need for organizing and storing parts. This is obvously a temporary need because as the work progresses, you construct parts and then assemble them.

I like to use a 4' scaffold as a mobile cart to store and organize the parts that I have made.

Using 4' scaffold as a mobile parts cart.

I bought my scaffold for $99 although I have noticed that the price has risen on them over the last couple of years. It comes with steel platform shelves to stand on and I used plywood to make more shelves. If it is not in use and I need more room, the shelves are removed so it can be folded and put in the storage room.

There are some nice storage carts on the market but I can still use this on a remodeling job as a scaffold. So it serves a dual purpose as it works well in the shop and in the field.

Designing & Project Modeling

I see a lot of discussions online about how to model and when it is appropriate. There are articles that describe a romantic process of applying the formulas for determining proportion, balancing that with artistic expression, and topping it off with a little social sophistication.

I do model work quite frequently for my projects and it is a function that seems rather pedestrian and normal in my shop.

I am currently working on some rustic cabinetry that is being constructed from doug fir beams, these were left over from the construction of a timber frame home (See previous entries to find out more.) I did the drawings in SketchUp and they looked pretty good.

SketchUp detail of cabinet doors.

However, I did have some reservations. One thought was that the rail on the bottom of the upper cabinets looked a little narrow. I also wanted to confirm the placement of the middle rail which separate the upper and lower panels.The best way to confirm the design was to make a full scale model.

The thing to remember with a model, is just that - it is a model. It is not necessary to use the intended or traditional joinery to build it, nor is it necessary to use the actual material. It can be hot glued, super glued (cyanoacrylate), stapled together out of cardboard, styrofoam, or any inexpensive material to create a representation in form.

In this case I used the actual stock because I wanted to see how the material I am using would handle. To date it has been giving me fits that at times just kills me.

For this model, I cut the pieces to the exact width and length so that I could arrange them on the table. This allowed me to see the outside dimension and play with the negative space, that would be where the panels go, by moving the middle rail into a location that "felt" right visually. This confirmed that the best location for it was where I had placed it in the SketchUp drawing.

The real quesion in my mind was about the bottom rail. I was not sure that it actually was wide enough to be properly in balance and proportioned to the overall width and height. There seemed to be no exact answer on this matter, but there was a range of acceptability.

My original drawing started out with a 3 1/2" wide bottom rail.

3 1/2" bottom rail just a bit small.

You will notice in the photo above that there are three more blocks of wood laying next to the door model. By adding each one I could make the rail 4 1/4", 4 1/2". or 5" wide.

The 3 1/2" rail felt narrow so I decided to go to the far end of the range of acceptability. I tried 5 1/2" but that was a bit too wide, so I immediately cut it down to 5" and it seemed that I had hit the other end of the limit pretty good.

5" bottom rail just a bit too big.

After trying all of the sizes I decided that the 4 1/2" bottom rail felt the best. It would also work with the overall plan in consideration of the other cabinets that will be part of the project. Some of the cabinets will go floor to ceiling and they may need a larger bottom rail yet. Everything will need to tie together proportionally.

After getting the layout and component sizes confirmed, I used cyanoacrylate glue to assemble the panel frame pieces. Remember - this is a model, there is no need to use traditional joinery. However, there is value to using the intended joinery if you need to do test runs to understand the handling characteristics of the material.

A quick assembly with cyanoacrylate.

I attached a piece of plywood to the backside and inserted some panel material that was too warped to use in the actual project. I cut the panels to drop into the frame then glued and face nailed it with the brad nailer.

Inset panels are added to the model, they are just glued and face nailed.

Now I have an accurate representation of how the actual panels will look.

I did not need to use the actual material, but I had enough and wanted to test it's handling characteristics. I can also show the clients a picture via email or the actual panel so they can have confirmation of how it will look.

Finished model confirms door proportions.

As you can see, models are quite often a part of the normal design process. Drawings in proportion will reveal a lot of issues with proportion and balance, but sometimes you just need the full mass of the project in front of you to make a final decision. If the project is too large, even a scale model will help.

I hope this helps you understand the function and importance of modeling. It is not just for artsy studio projects, but for common projects like cabinetry as well.

Your friend in the shop - Todd A. Clippinger

Share the Love ~ Share the Knowledge


A Rustic Office

Difficult Material

The doug fir beams for this project have proven to be the most difficult material that I have ever used. They are 10"x10" beams that have been laying outside for 10 years.

Beams on ground.jpg

Beams stored outside for 10 years.

The beams have been stacked and stickered but they are completely exposed to the elements. That may include desperately hot temps in the summer to subzero in the winter and all the snow or rain that the seasons bring.

I had the beams rough milled and have continually taken the material down in stages with lots of moisture meter readings to follow it's drying and acclimation process.

rough beams in truck.jpg

Beams rough milled, ready to stack and dry in the shop.

Some of the material has come down to the recommended 6%-8% moisture content but it is still more unstable than kiln dried stock. A good example of this is how the panels require a few days to settle down after being glued up. The moisture introduced during glue up causes them to get a little crazy but they will settle down as the moisture leaves them over the next 2 or 3 days and then they seem to be stabilized.

panels in glue-up.jpg

Panels in glue up.

To get an accurate moisture reading I have extra stock cut due to the anticipated high loss rate. I cut the twisting stock open to take readings on the inside to see how it compares with the outside. This process allows me to get the most accurate reading and sense of stability characteristics.

A Fitting Design

Fortunately the clients want a chunky hand hewn effect. The home is a timber frame with very heavy woodwork in it. The client described it as having a "Fred Flinstone chunkiness to it." That would be an accurate description and it looks good with the wood floors, plaster textured walls, and stone fireplace.

Fred Flinstone Chunky Interior.jpg

Fred Flinstone chunky interior.

The rough textures of the handwork and saw marks are clearly evident on the wood. To create the effect of milling marks on the desk top I used a belt sander with 50 grit and sanded it in two directions to create an "X" pattern with the scratch marks to create a milled effect. It worked pretty good.

Mill Marks effect.jpg

Millwork effects on desk top.

The front edge of the desk was sanded to create a hand hewn effect. I was virtually using the belt sander to sculpt the surface and it worked quite well. The look is proportional to the project and is fitting to the decor.

Rustic Front Edge.jpg
Desk top.jpg

Rustic front edge on desk.Rustic Desk

The rustic look is a perfect interpretation of this material. It allows me a little grace for the way the wood is behaving. For as challenging as the wood has been, I feel confident that I can get some stable stock for the doors (at least I hope so;)

That's all for now.

Your friend in the shop - Todd A. Clippinger

Share the Love~Share the Knowledge